What is Color Management, and How Does it Affect Digital Photography?
What is Color Management, and How Does it Affect Digital Photography?
Subscribe to YouTube
Color Gamut, Color Profiles, and Color Management

WHAT IS COLOR GAMUT?
A color gamut is a range of colors that can be represented by a given color model. The term gamut is derived from the Latin word for “range” or “scope”. The gamut of a color model is often represented by a three-dimensional graph, with the vertical axis representing lightness or value, the horizontal axis representing chroma or saturation, and the depth axis representing hue.
HOW DOES IT AFFECT DIGITAL PHOTOGRAPHY?
Color gamut is the range of colors that a device can produce. The human eye can see a gamut of about 10 million colors. Most digital cameras can only capture a fraction of those colors. The gamut of a digital camera is affected by the sensor, lens, and color filters.
The sensor in a digital camera captures light and converts it into electrical signals. The lens focuses the light onto the sensor. The color filters in the camera determine which colors of light are captured by the sensor.
The human eye can see a wider range of colors than any digital camera can capture. The gamut of a digital camera is smaller than the human eye because the camera sensor, lens, and color filters can only capture a limited range of colors.
In photography you would want to open and edit in a large color gamut. You can always convert and save in something like sRGB, but if you start in sRGB you will clip all colors outside that profile. It is better to start with more and then remove what you do not need. I have plenty of videos on workflow if you are interested in this concept.
COLOR PROFILES
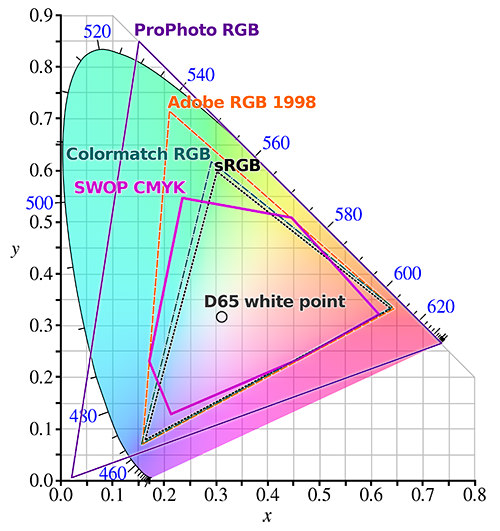
In the above image you will see a variety of different color profiles, and the color gamut they cover. Color profiles also called ICC profiles, stands for the International Color Consortium are used for managing color or color management in digital photography. Below is a simple list and an information brief on each element in the graphic above.
- D65-stands for the white point which is measured in Kelvin, in this case 6500K.
- SWOP CMYK-the density of Cyan, Magenta, Yellow and Black printing.
- sRGB-stands for standard Red, Green and Blue color space. sRGB is the standard color space for the web. More info on Wikipedia.
- Colormatch RGB-is color space designed for the Radius PressView monitor. Colormatch RGB is not really used anymore.
- Adobe RGB (1998)-Adobe RGB which used to be known as Adobe 1998 was developed by Adobe in 1998. It was designed to encompass most of the colors achievable on CMYK color printers, but by using RGB primary colors on a device such as a computer display. This is the color profile I use when working on digital photography.
- ProPhoto RGB-is an is an output referred color space developed by Kodak. It is a massive color space designed for photography. The issue is the color space is so large it is out of the visible spectrum. Most printers and monitors cannot take advantage of the color space. More info on Wikipedia.
Above are your typical color profiles. A newcomer is the P3 color profile. You will also run into custom profiles. Those are usually created by someone calibrating their monitor with something like the Data Color Spyder or xRite i1 Display. When you calibrate your monitor to ensure it is accurate, you set your Kelvin temperature, gamma, and luminance. My settings are D6500K, Gamma 2.2, and Luminance of 120. This is a pretty standard calibration for photography. If you would like to see me calibrate my computer feel free to watch this video.
8 bit vs. 16 bit
The second part of the equation is make sure you open a RAW image in16 bit vs 8 bit. Most cameras do not capture images in 16 bit, they tend to be in 12 or 14 bit. The difference between 8 and 16 bit is significant. 8 bit has 256 values in the red, green and blue channels which translates to 16.7 million colors. 16 bit has 65,536 values in red, green and blue which translates to 281 trillion colors. The difference is night and day. I would show a photo but it can be difficult to see because all images on a webpage are 8 bit. You can download this file and make sure you open it in 16 bit, and see the difference. Below is a simplified example of switching from 16 bit to 8 bit. In Adobe Photoshop you have the option from choosing from a smooth gradient with thousands of colors, or the web color palette. Think of the 16 bit as the smooth gradient and 8 bit as the web palette. When you convert to 8 bit if a color is not available it will change that color to the closest available. Note: I have a 5k iMac and it can only display 95% of the Adobe RGB Color gamut.


PRINTING PROFILES

Printing profiles are different than most of the above color profiles, but you can use the above profiles in printing. Printing profiles are different in that they are printer and paper specific. An example would be if you have an Epson 5000 printer and what to print the same image on both Premium Glossy paper and Enhanced Matte. paper. The printer is the same but it would use two totally different printing profiles. Not only will it use two different profiles but how the profiles are managed can differ. You can have the printer manage the color profile or have the application like Photoshop mange the color. Both the printer and application will take the working profile (This is the profile you are using in your photo editor) and re-map the color for the printer profile. One major difference between a glossy and matte paper on an Epson 5000 printer are the inks. The glossy paper uses “photo black” which has a glosser, and the matte paper uses a “matte black” ink.
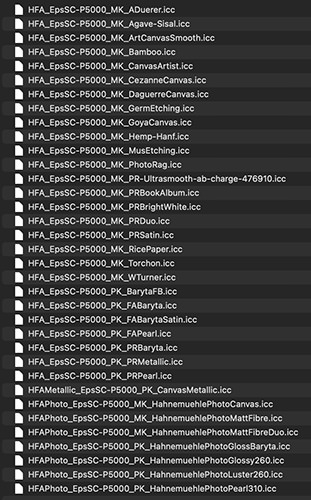
On the left you will see the current printer profiles for Hanhemuhle paper using an Epson SureColor 5000. You would need to follow the directions on how to load the into your system. Remember profiles are Printer and Paper specific.
COLOR MANAGEMENT STEPS
Color Management is simply this entire process of managing color from camera to output. That exact process really depends on what you are doing, and what you are using. Your first step is to either calibrate your monitor or set you computer to a color space. In my case I calibrate and if you want more information on that process check out this post. If you are not going to calibrate set your computer to a color space. On a Mac go to System Preferences/Display/Color Profile. The will not be exact but simulation of whatever profile you select. For photography I would suggest Adobe RGB.
Step two depends on what format you a using on your digital camera. If you are shooting in .jpg I would suggest you use the Adobe RGB color space, because it is a larger color gamut. By default it is usually set on sRGB. If you are shooting in RAW, you do not have to worry about setting a color space in camera, because it will be done in RAW conversion.
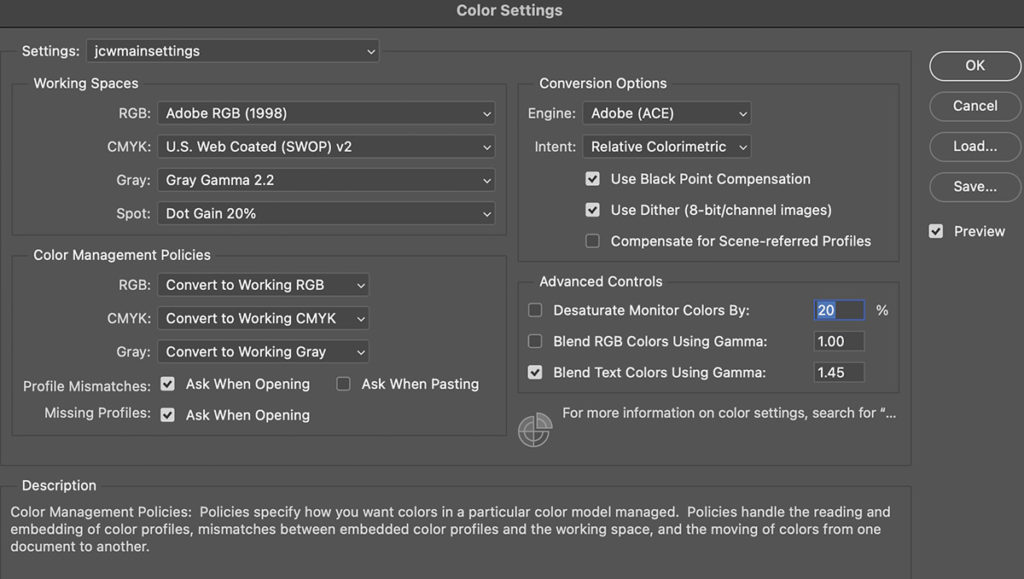
Step three, is to open your photo editing program like Photoshop and set-up color management. The first group is working spaces. This means the color space you want Photoshop to work in or convert to. I have RGB set to Adobe RGB, and switched Gray to Gray Gamma 2.2. The next sections is Color Management Policies. Meaning what do you want Photoshop to do if the color profile does not match the working space profile. I switched everything to Convert to Working, but I checked Profile Mismatches and Missing Profiles. The will bring up a dialog box that asks if I want to convert to my working profile. I do this because there are occasions I do not want to convert.


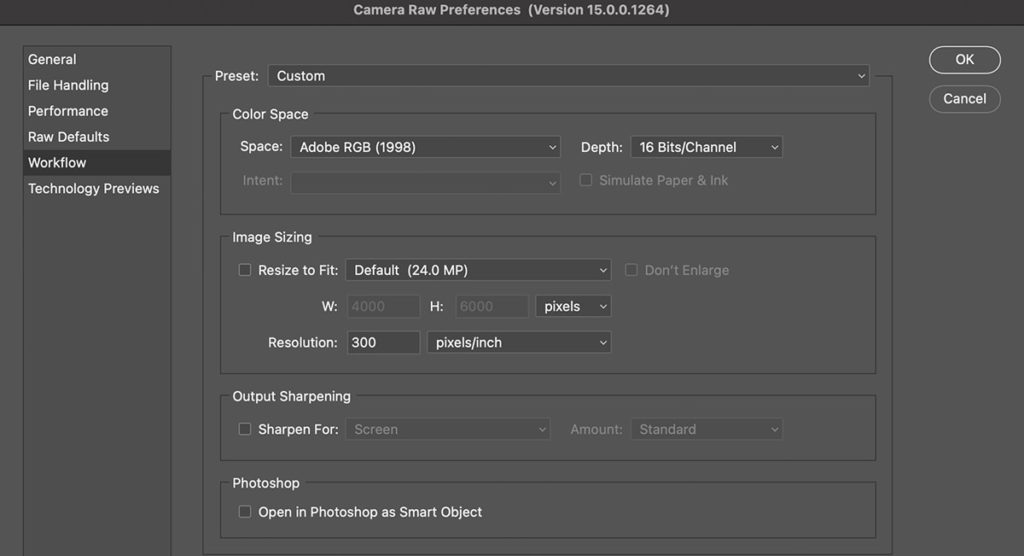
Step four, if needed is to open your RAW file. Raw files cannot directly be opened in photo editing programs. They must first go through a raw file converter like Adobe Camera Raw or Adobe Lightroom Classic. In Adobe Camera Raw you can set your color profile in the Camera Raw Preferences/Workflow/Space. I set mine to Adobe RGB, the Depth to 16 bits and I changed resolution from 240 to 300 ppi, because most of my printing is at 300 ppi.
Step five, is to save your toned image. I would not crop or size the image at this point. I save as a .psd file. As you can see in the image to the right there is a box checked by default that says during the save, it will embed the Color Profile into the image.


Step six, is to size, sharpen and convert your profile if needed. If you are saving to the web like in the case on the left. You need to change from your working profile to sRGB, unless you are working in sRGB then skip this step. If you are outputting to print and the image should be in Adobe RGB, you can skip this step. If sending to a third party vendor or client you need to find out what color space they require.
The last step would be if you were printing the images at home. I will get an example for this but I do not have one at the moment. You need to make sure you know how to manage the color. This can either be done through the program like Photoshop or managed by the printer. Remember from above, printing profiles are printer and paper specific.

