Understanding the 3 Elements of the Exposure Triangle, Mastering Manual Photography
Understanding the 3 Elements of the Exposure Triangle, Mastering Manual Photography
Subscribe to YouTube
Mastering Manual Photography, Exposure Triangle
The Exposure Triangle. Whether you want to learn to photography in manual or just learn how to take better photographs. Understanding the exposure triangle is key. If you do not know how a camera works, it will be difficult to get consistent results. Using a DSLR or Mirrorless camera is much different from tapping a button on a phone. If I were to be truthful, I would say you are learning to control your camera. That is why most professional photographers work in manual. It is about accuracy and control. If I want to stop action by using an extremely high shutter speed like 1/4000th of a second. I want to manually set that not, just assume or hope the automatic modes know to use 1/4000 vs. 1/1000 which can produce drastically different results.
In this video I will explain the three aspects of the exposure triangle, what they do, and how they work together to create an exposure. Shutter speed, aperture, and ISO all control the amount of light that enters the camera. Each aspect has a secondary function which is listed below. You will need to watch the next video to understand how to use the camera’s meter, so you can actually achieve a manual exposure.
Equivalent Exposures
Once you understand the exposure triangle and manual exposure it will be time to move on and work with equivalent exposures. The is the shift of the exposure triangle so you have different settings that change how your image is captured. However, the exposure stays the same. It takes time to get used to this process but you will have difficulty moving forward until you fully understand the exposure triangle and equivalent exposures.
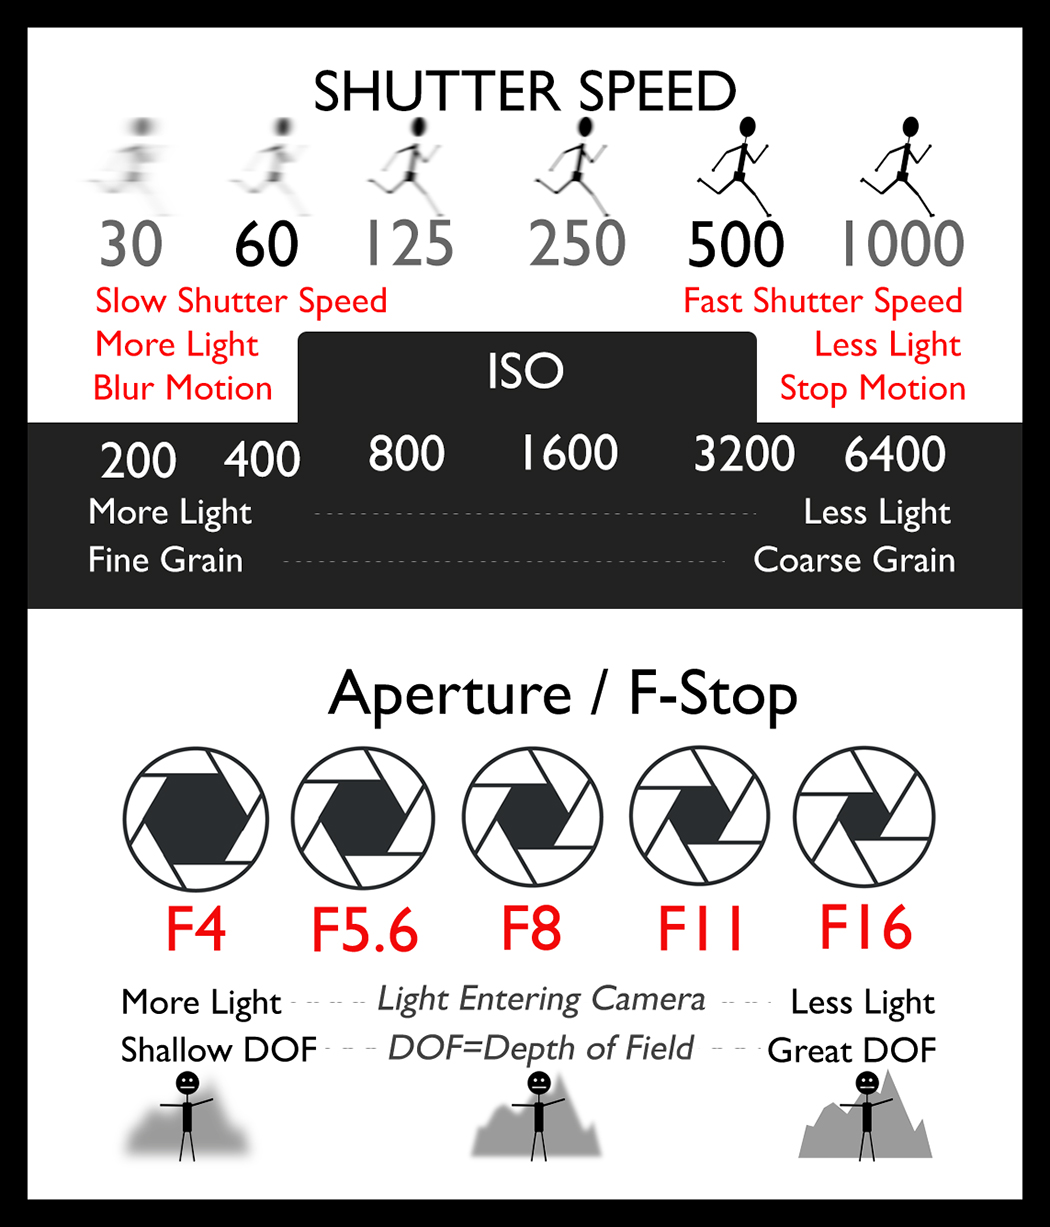
The exposure triangle comprises the three main functions of a camera
- Shutter Speed: This controls motion in the image, and the amount of light that enters the camera.
- Aperture: This controls “Depth of Field,” and the amount of light that enters the camera.
- ISO: This controls the sensitivity of the cameras sensor, and the amount of light that is needed to take a photograph.

The exposure triangle is a fundamental concept in photography that plays a pivotal role in capturing well-exposed and visually appealing images. It involves three key elements: aperture, shutter speed, and ISO. These elements interact with each other to determine the overall exposure of an image, controlling how much light reaches the camera’s sensor. In this comprehensive explanation, we’ll delve deep into each component of the exposure triangle, how they relate to one another, and how they impact the final outcome of your photographs.
Aperture: The Gateway to Light Control
Aperture refers to the opening in the camera lens through which light passes and reaches the camera’s image sensor or film. It is measured in f-stops, represented as numbers like f/1.8, f/4, f/8, etc. The f-stop value denotes the size of the aperture opening; the lower the number, the wider the aperture, and the more light it allows to enter the camera.
The aperture serves two primary functions in photography:
- Control of Light: The primary function of the aperture is to control the amount of light that enters the camera. A wide (low f-stop) aperture lets in a lot of light, making it suitable for low-light conditions or achieving a shallow depth of field. Conversely, a narrow (high f-stop) aperture restricts the amount of light, ideal for well-lit scenes or when you want a deep depth of field.
- Depth of Field (DoF): Aperture also influences the depth of field in your photographs. Depth of field refers to the range of distances in your image that appears in sharp focus. A wide aperture (low f-stop) creates a shallow depth of field, where the subject is in focus, while the background and foreground are blurred. This is often used for portraits or when you want to isolate a subject from its surroundings. On the other hand, a narrow aperture (high f-stop) increases the depth of field, making more of the scene appear sharp and in focus, suitable for landscape photography.
In summary, aperture controls both the amount of light and the depth of field in your photographs. It provides creative control over the visual aesthetics of your images, allowing you to emphasize or de-emphasize certain elements within the frame.
Shutter Speed: Capturing Motion and Controlling Exposure
Shutter speed, also known as exposure time, is the duration for which the camera’s sensor or film is exposed to light. It is measured in seconds or fractions of a second, such as 1/1000s, 1/250s, 1/30s, etc. Shutter speed plays a critical role in photography for several reasons:
- Motion Control: Shutter speed controls how motion is captured in your photographs. A fast shutter speed (e.g., 1/1000s) freezes fast-moving subjects, such as sports or wildlife. Conversely, a slow shutter speed (e.g., 1/30s) introduces motion blur, which can be creatively used to convey a sense of motion or capture long-exposure effects like light trails or flowing water.
- Exposure Control: Shutter speed directly affects the exposure of your image. A faster shutter speed reduces the amount of light hitting the sensor, making it suitable for well-lit scenes or when you want to avoid overexposure. Conversely, a slower shutter speed allows more light to enter, making it appropriate for low-light conditions.
- Creative Effects: Manipulating shutter speed can yield creative effects. For example, using a slow shutter speed at night can capture streaking car lights or star trails. Alternatively, a fast shutter speed can isolate a subject against a blurred background, emphasizing its sharpness.
Shutter speed and aperture are intimately connected because they jointly determine the overall exposure of your image. Adjusting one necessitates compensating adjustments in the other to maintain a balanced exposure. This relationship is known as reciprocity.
ISO: Sensitivity to Light
ISO measures the sensitivity of your camera’s image sensor or film to light. It is represented as ISO values, such as ISO 100, ISO 400, ISO 1600, and so on. A lower ISO value (e.g., ISO 100) indicates low sensitivity to light, while a higher ISO value (e.g., ISO 1600) signifies higher sensitivity.
Here’s how ISO factors into the exposure triangle:
- Light Sensitivity: A higher ISO setting allows your camera to capture images in lower light conditions without the need for longer shutter speeds or wider apertures. This can be beneficial in low-light situations like indoor photography or nighttime shooting. However, higher ISO values also introduce digital noise, which can degrade image quality, leading to graininess and reduced detail.
- Exposure Control: ISO can be used to control exposure when you need to maintain a specific aperture and shutter speed combination. If you’re in a well-lit environment and desire a specific depth of field and motion capture, adjusting the ISO can help achieve the desired exposure.
- Creative Choices: ISO can also be used creatively. By deliberately choosing a higher ISO setting, you can intentionally introduce graininess or a “vintage” look to your photos. Conversely, using a lower ISO setting can result in cleaner, more detailed images.
Now that we’ve explored the individual components of the exposure triangle, let’s delve into how they interact to create well-exposed photographs.
Balancing the Exposure Triangle: Achieving Perfect Harmony
To capture a well-exposed image, you must balance the three elements of the exposure triangle: aperture, shutter speed, and ISO. Adjusting one setting affects the others, so finding the right combination is crucial.
- Exposure Value (EV): Exposure value is a numerical representation of your camera’s settings, combining aperture, shutter speed, and ISO. It represents the amount of light hitting the sensor and is measured in stops. A change of one stop either doubles or halves the amount of light.
- Reciprocity: As mentioned earlier, changing one element requires compensatory adjustments in the others to maintain the same exposure. For example, if you decide to use a wider aperture (lower f-stop) to achieve a shallower depth of field, you’ll need to increase the shutter speed or decrease the ISO to prevent overexposure.
Here are some scenarios to illustrate how the exposure triangle works:
- Low-Light Portrait: Suppose you’re taking a portrait in low light, and you want a shallow depth of field to isolate the subject. You might start with a wide aperture (e.g., f/1.8) for the desired background blur. To balance the exposure, you’ll need to slow down the shutter speed (e.g., 1/60s) and possibly increase the ISO (e.g., ISO 800).
- Fast Action Sports: For fast-action sports photography, you need to freeze motion. You’d choose a fast shutter speed (e.g., 1/1000s) to capture the action without blur. To balance the exposure, you might use a wider aperture (e.g., f/4) and adjust the ISO (e.g., ISO 400) accordingly.
- Landscape Photography: Landscape shots often require a deep depth of field to keep everything in focus. In this case, you’d select a narrow aperture (e.g., f/16) and a lower ISO (e.g., ISO 100). To balance the exposure, you’ll likely need to use a slower shutter speed (e.g., 1/30s) because less light is entering the camera due to the narrow aperture.
Remember that the choice of settings isn’t just about achieving proper exposure but also about creative expression. Different combinations of aperture, shutter speed, and ISO can result in vastly different visual outcomes. Experimentation is key to developing your photography skills and finding your own style.
Considerations and Advanced Techniques
While the exposure triangle forms the foundation of exposure control in photography, there are additional considerations and advanced techniques to enhance your skills:
- Metering: Understanding your camera’s light metering modes (e.g., spot, center-weighted, evaluative) helps you determine the optimal exposure settings. Spot metering, for instance, measures light from a specific area, allowing precise exposure control for a subject.
- Bracketing: Exposure bracketing involves taking multiple shots of the same scene at different exposure settings. This technique ensures you capture the perfect exposure and provides options for blending or selecting the best shot in post-processing.
- Long Exposure: Long exposure photography involves using slow shutter speeds (often seconds to minutes) to create dramatic effects like silky waterfalls, star trails, or light painting.
- Hyperfocal Distance: Understanding hyperfocal distance helps maximize the depth of field, ensuring both near and far objects are in focus. This is particularly useful in landscape photography.
- Exposure Compensation: In situations where the camera’s metering system may be fooled by extreme lighting conditions, you can use exposure compensation to adjust the automatically calculated exposure values.
- Use of Filters: Neutral density (ND) filters and polarizing filters can further aid in controlling light and achieving desired effects, such as reducing glare, enhancing contrast, or extending shutter speeds.
In conclusion, the exposure triangle is a fundamental concept in photography that encompasses aperture, shutter speed, and ISO. These three elements work together to control the amount of light that enters the camera and influence creative aspects like depth of field, motion capture, and image noise. Balancing the exposure triangle is essential for achieving well-exposed photographs, but it also allows for creative expression and experimentation. As you continue to explore and refine your photography skills, you’ll discover how to leverage these settings to capture stunning and visually compelling images that tell your unique story.
Free .pdf Exposure Triangle Card! Click this Link

Camera Memory Cards
Above are a series of camera memory cards. The blue is a the slowest 32GB SD Class 4 card made by SanDisk. (SanDisk makes excellent cards) The black extreme pro by SanDisk is a 32 GB SD Class 10, and UHS Class 3 card. The Gold is a SanDisk 32 GB Compact Flash UDMA 7 card. The second black SanDisk extreme Pro is a 128 GB SD II Class 10, and UHS Class 3 card. The SanDisk Extreme Pro is a 62GB CF express card. The last is a Sony 64GB XQD card.
Capacity
This is the number written in GB (gigabytes). This stands for how much data can be saved on the card. There is not much of a cost difference as far as capacity. You will see more of a difference in speed and class.
Speed
This is the number written in MB/s (megabytes per second). If you see Mb that stands for megabits per second. There are 8 megabits in a byte. Your internet speed is in megabits per second. What is important is that if you only see one number that is for the read speed. In those case the write speed is much slower. Note: the blue card is so slow they didn’t even list it. Do not buy that card.
Class
Classes stand for minimum sequential write speed
- Class 4-4 MB/sec good for photo only
- Class 10-10 MB/sec good for HD Video
- UHS 3-30MB/second good for HD & 4K Video
- UDMA 7-Max Transfer Rate 167MB/sec
- CF express and XQD are so fast they do not have classes and will work with 8K Video
I have a Facebook Group called, “Learn Adobe Lightroom, Photoshop, and Bridge.” I created this group because I get a lot of questions on YouTube that are hard to answer unless I can see the issue. This will allow a place you can ask questions, and more importantly post images and videos.


